Controls are graphical interface elements with specific functions. They allow building program interfaces like stacking blocks. Controls are a way to reuse code. Common controls include labels, text boxes, command buttons, option buttons, checkboxes, list boxes, combo boxes, spin buttons, and frames.
Methods for Creating Controls
In Excel VBA, controls can be created at design-time or run-time; in Python Tkinter, controls can only be created at run-time using specific functions.
[Excel VBA]
Design-time: Click the icon of the desired control in the Toolbox, then click and drag on the form to draw it interactively (“what you see is what you get”).
Run-time: Use the Add method of the Controls object. The Controls property of a form returns a Controls object that manages all controls on the form. The Add method has the form:
Set lblT = UserForm1.Controls.Add("forms.ctlType.1", ctlName, True)where lblT is an Object, UserForm1 is a form object, "forms.ctlType.1" specifies the control type, and ctlName is the control name.
Example: Add a label with text “New Label” when the form is activated (sample file: Samples\ch14\Excel VBA\标签.xlsm):
Private Sub UserForm_Activate()
    Dim lblT As Object
    Set lblT = UserForm1.Controls.Add("forms.label.1", "Label1", True)
    lblT.Caption = "New Label"
End Sub
[Python Tkinter] Use specific functions to create controls. For example, create a command button with text “OK”, width 8, and yellow background, then place it 10 units from the top of the form:
>>> from tkinter import *
>>> form = Tk()
>>> form.geometry('400x160+100+100')
>>> btn = Button(form, text='OK', width=8, background='yellow')
>>> btn.pack(pady=10)
Common Properties of Controls
Some properties are shared by most controls and are introduced separately here. These relate to position, size, color, font, border, style, and images.
[Excel VBA] Common properties of controls in Excel VBA:
Left, Top: Horizontal and vertical coordinates of the control’s top-left corner in the form’s coordinate system.
Width, Height: Control width and height.
BackColor, ForeColor: Background and foreground colors.
Font: Control font.
BorderColor, BorderStyle: Border color and style.
Picture: Display an image.
Visible: Control visibility.
These properties can be set at design-time or run-time (refer to Section 2.1.2 for form property settings).
Setting control color: Use color constants, integers, hexadecimal numbers, or the RGB function. For example, change a command button’s background to red when clicked:
Private Sub CommandButton1_Click()
    CommandButton1.BackColor = vbRed          ' Color constant
    ' CommandButton1.BackColor = 255          ' Integer
    ' CommandButton1.BackColor = &HFF&        ' Hexadecimal
    ' CommandButton1.BackColor = RGB(255,0,0)' RGB function
End Sub
Setting control font: Use the Font property to return a Font object, then set its attributes. For example, change a command button’s font when clicked:
Private Sub CommandButton1_Click()
    With CommandButton1.Font
        .Name = "Arial"        ' Font name
        .Size = 16            ' Font size
        .Bold = True          ' Bold
        .Italic = True        ' Italic
        .Underline = True     ' Underline
        .Strikethrough = True ' Strikethrough
    End With
End Sub
[Python] Common properties of controls in Python Tkinter:
width, height: Control width and height (position relates to layout; see Section 2.2.3).
background, foreground: Background and foreground colors.
font: Font settings.
borderwidth: Border width.
padx, pady: Distance between text and control edges.
relief: Control appearance style.
image: Display an image.
command: Associate an event response.
Setting methods: Refer to Section 2.1.2 for form property settings.
Control colors can be set with constants or hexadecimal numbers:
>>> btn = Button(form, text='OK', width=8)
>>> btn['background'] = 'red'
# Or:
>>> btn['background'] = '#FF0000'Common color constants: red, green, blue, yellow, orange, lightgreen, lightblue, lightyellow, etc.
Set font with the font property (e.g., SimSun, size 15, bold, italic, underline, strikethrough):
>>> btn['font'] = ('Arial', 15, 'bold', 'italic', 'underline', 'overstrike')Set style with the relief property (e.g., raised):
>>> btn['relief'] = 'raised'Available styles: flat, raised, sunken, groove, ridge, solid.
Layout of Controls
Layout refers to arranging controls reasonably on the form to achieve the desired visual effect.
[Excel VBA]
Design-time: Interactive layout via “what you see is what you get”; the Format menu provides alignment, size unification, and spacing commands.
Run-time: Use Left/Top to set position and Width/Height to set size.
[Python Tkinter] Three layout methods: place, pack, and grid.
Place layout: Similar to Excel VBA; precisely specify position and size using the place() method. Parameters:
x, y: Top-left corner coordinates.
width, height: Control size.
relx, rely: Relative coordinates (0–1).
relwidth, relheight: Relative size (0–1).
Pack layout: Dock controls to a side of the form to divide space. Use the pack() method. Parameters:
anchor: Alignment (N, S, W, E, etc.).
side: Dock position (top, bottom, left, right; default: top).
fill: Fill direction (X for horizontal, Y for vertical).
expand: Expandability (1 for expandable, 0 for not).
Grid layout: Arrange controls in a grid. Use the grid() method. Parameters:
row, column: Row/column index (0-based).
rowspan, columnspan: Merge rows/columns.
sticky: Alignment (N, S, W, E, etc.).
Common parameters for pack and grid:
padx, pady: External distance to left/right or top/bottom.
ipadx, ipady: Internal distance between text and control edges.
Label Control
Labels display non-interactive, unmodifiable text.
[Excel VBA]
Design-time: Click the label icon in the Toolbox, then draw interactively on the form. Set properties in the Properties panel; use Caption for text.
Run-time: Use Controls.Add. Example (sample file: Samples\ch14\Excel VBA\Labels.xlsm):
Private Sub UserForm_Activate()
    Dim lblNew As Object
    Set lblNew = Me.Controls.Add("forms.label.1", "Label1", True)
    With lblNew
        .Left = 10: .Top = 10
        .Width = 100: .Height = 20
        .BackColor = RGB(255, 255, 0)  ' Yellow background
        .Caption = "Label Example"
    End With
End Sub
[Python] Use Label() to create labels. Example (sample file: Samples\ch14\Python\Label.py):
from tkinter import *
form = Tk()
form.geometry('300x120+100+100')
# Label 1: light green background
lbl1 = Label(form, text='This is a label')
lbl1.pack()
lbl1['background'] = 'lightgreen'
# Label 2: raised style, red text, SimHei font
lbl2 = Label(form, text='This is the 2nd label')
lbl2.pack()
lbl2['relief'] = 'raised'
lbl2['foreground'] = 'red'
lbl2['font'] = ('黑体', 15, 'bold', 'italic', 'underline')
# Label 3: wrapped text
lbl3 = Label(form, text='This is the 3rd label This is the 3rd label')
lbl3.pack()
lbl3['wraplength'] = 120
lbl3['background'] = 'lightblue'
lbl3['width'] = 20
lbl3['height'] = 3
form.mainloop()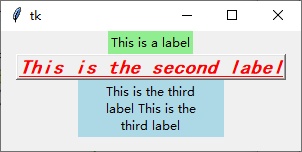
Figure 2-3 Creating labels
Text Box Control
Text boxes allow interactive input and display of text.
[Excel VBA]
Design-time: Draw interactively; set Text property for content.
Run-time: Use Controls.Add. Example (sample file: Samples\ch14\Excel VBA\Textbox.xlsm):
Private Sub UserForm_Activate()
    Dim txtNew As Object
    Set txtNew = Me.Controls.Add("forms.textbox.1", "TextBox1", True)
    With txtNew
        .Left = 10: .Top = 10
        .Width = 100: .Height = 20
        .BackColor = RGB(255, 255, 0)
        .Text = "Text Box Example"
    End With
End Sub
[Python Tkinter]
Single-line text box: Use Entry(). Example (sample file: Samples\ch14\Python\Single Line Textbox.py):
from tkinter import *
form = Tk()
form.geometry('400x160+100+100')
# Entry 1: selected text color
en1 = Entry(form)
en1.pack()
en1.insert('end', 'Single-line text box')
en1['selectbackground'] = 'lightblue'
en1['selectforeground'] = 'red'
en1.focus_set()
en1.select_range(0, 2)
# Entry 2: insert text at cursor
en2 = Entry(form)
en2.pack()
en2.insert('end', 'Single-line text box')
en2.icursor(1)
en2.insert('insert', 'Single-line text box')
# Entry 3: show asterisks
en3 = Entry(form)
en3.pack()
en3.insert('end', 'Single-line text box')
en3['show'] = '*'
form.mainloop()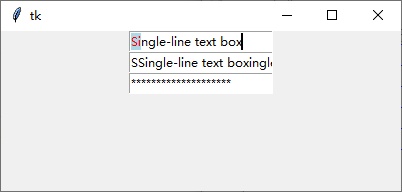
Figure 2-4 Creating single-line text boxes
Multi-line text box: Use Text(). Example (sample file: Samples\ch14\Python\Multiple Line Textbox.py):
from tkinter import *
form = Tk()
form.geometry('400x200+100+100')
# Text 1: selected text color
txt1 = Text(form, width=50, height=3)
txt1.pack()
txt1.insert('end', 'Multi-line text box...')
txt1['selectbackground'] = 'lightblue'
txt1['selectforeground'] = 'red'
# Text 2: insert at mark
txt2 = Text(form, width=50, height=3)
txt2.pack()
txt2.insert('end', 'Multi-line text box')
txt2.mark_set('pos', '1.2')
txt2.insert('pos', 'Inserted content')
# Text 3: insert at position
txt3 = Text(form, width=50, height=3)
txt3.pack()
txt3.insert('end', 'Multi-line text box')
txt3.insert('1.2', 'Inserted content')
form.mainloop()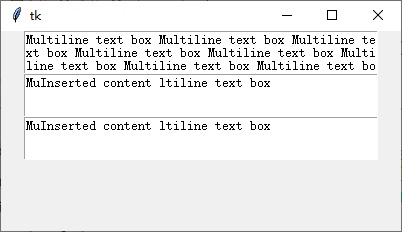
Figure 2-5 Creating multi-line text boxes
Command Button Control
Command buttons issue instructions.
[Excel VBA]
Design-time: Draw interactively; set Caption for title.
Run-time: Use Controls.Add. Example (sample file: Samples\ch14\Excel VBA\Command Button.xlsm):
Private Sub UserForm_Activate()
    Dim cmdNew As Object
    Set cmdNew = Me.Controls.Add("forms.commandbutton.1", "Button1", True)
    With cmdNew
        .Left = 10: .Top = 10
        .Width = 100: .Height = 20
        .BackColor = RGB(255, 255, 0)
        .Caption = "Command Button Example"
    End With
End Sub
Use the Click event to issue instructions. Example (sample file: Samples\ch14\Excel VBA\Command Button 2.xlsm):
Private Sub CommandButton1_Click()
    Me.Caption = "Command Button Click Event Test"
End Sub
[Python Tkinter] Use Button(). Example (sample file: Samples\ch14\Python\Command Button.py):
from tkinter import *
def callback():
    print('Confirmed')
def callback2(para):
    print(para)
form = Tk()
form.geometry('400x160+100+100')
# Button 1: light green, calls callback
btn1 = Button(form, text='OK', width=8, command=callback)
btn1.pack(pady=10)
btn1['background'] = 'lightgreen'
# Button 2: light blue, calls callback2 with parameter
btn2 = Button(form, text='Parameter OK', width=8, command=lambda: callback2('Parameter OK'))
btn2.pack(pady=10)
btn2['background'] = 'lightblue'
# Button 3: exit
btn3 = Button(form, text='Exit', width=8, command=form.destroy)
btn3.pack(pady=10)
form.mainloop()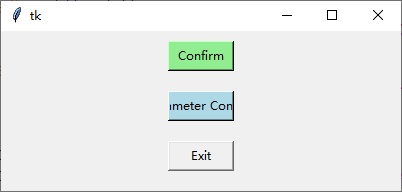
Figure 2-6 Creating command buttons
Option Button Control
Option buttons enable single selection from a group.
[Excel VBA]
Design-time: Draw interactively; set Caption for text and Value for selection state (True = selected).
Run-time: Use Controls.Add. Example (sample file: Samples\ch14\Excel VBA\Option Button.xlsm):
Private Sub UserForm_Activate()
    Dim optNew As Object
    Set optNew = Me.Controls.Add("forms.optionbutton.1", "Option1", True)
    With optNew
        .Left = 10: .Top = 10
        .Caption = "Option 1"
        .Value = True
    End With
    Dim optNew2 As Object
    Set optNew2 = Me.Controls.Add("forms.optionbutton.1", "Option2", True)
    With optNew2
        .Left = 10: .Top = 30
        .Caption = "Option 2"
        .Value = False
    End With
End Sub
[Python Tkinter] Use Radiobutton(). Example (sample file: Samples\ch14\Python\Option Button.py):
from tkinter import *
form = Tk()
form.geometry('300x120+100+100')
def OptBtn():
    if g1.get() == 0:
        print('You are male')
    else:
        print('You are female')
g1 = IntVar()  # Shared variable for the group
g1.set(0)      # Select first option
# Create options
rdn1 = Radiobutton(form, text='Male', variable=g1, value=0)
rdn1.grid()
rdn2 = Radiobutton(form, text='Female', variable=g1, value=1)
rdn2.grid()
# Confirm button
btn = Button(form, text='OK', width=8, command=OptBtn)
btn.grid(pady=10)
btn['background'] = 'lightgreen'
form.mainloop()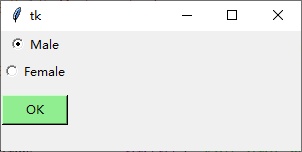
Figure 2-7 Creating option buttons
Checkbox Control
Checkboxes enable multiple selection.
[Excel VBA]
Design-time: Draw interactively; set Caption for text and Value for checked state (True = checked).
Run-time: Use Controls.Add. Example (sample file: Samples\ch14\Excel VBA\Check Box.xlsm):
Private Sub UserForm_Activate()
    Dim chkNew As Object
    Set chkNew = Me.Controls.Add("forms.checkbox.1", "Check1", True)
    With chkNew
        .Left = 10: .Top = 10
        .Caption = "Checkbox 1"
        .Value = True
    End With
    Dim chkNew2 As Object
    Set chkNew2 = Me.Controls.Add("forms.checkbox.1", "Check2", True)
    With chkNew2
        .Left = 10: .Top = 30
        .Caption = "Checkbox 2"
        .Value = False
    End With
End Sub
[Python Tkinter] Use Checkbutton(). Example (sample file: Samples\ch14\Python\Check Box.py):
from tkinter import *
form = Tk()
form.geometry('300x120+100+100')
def ChkBtn():
    str_hobby = ''
    if g1.get() == True:
        str_hobby += chk1['text'] + ' '
    if g2.get() == True:
        str_hobby += chk2['text'] + ' '
    if g3.get() == True:
        str_hobby += chk3['text']
    print('Your hobbies: ' + str_hobby)
g1 = DoubleVar(value=True)  # Default checked
g2 = DoubleVar()
g3 = DoubleVar()
# Create checkboxes
chk1 = Checkbutton(form, text='Music', variable=g1)
chk1.grid()
chk2 = Checkbutton(form, text='Art', variable=g2)
chk2.grid()
chk3 = Checkbutton(form, text='Sports', variable=g3)
chk3.grid()
# Confirm button
btn = Button(form, text='OK', width=8, command=ChkBtn)
btn.grid(pady=10)
btn['background'] = 'lightgreen'
form.mainloop()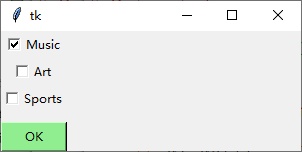
Figure 2-8 Creating and using checkboxes
List Box Control
List boxes display multiple options for selection.
[Excel VBA]
Design-time: Draw interactively. Key properties/methods:
ColumnCount: Number of columns.
RowSource: Data source (e.g., Sheet1!A1:E5).
MultiSelect: Selection mode (0 = single, 1 = multiple, 2 = extended).
AddItem, RemoveItem: Add/remove items.
Run-time: Use Controls.Add. Example (sample file: Samples\ch14\Excel VBA\List Box.xlsm):
Private Sub UserForm_Activate()
    Dim lstNew As Object
    Set lstNew = Me.Controls.Add("forms.listbox.1", "list1", True)
    With lstNew
        .Left = 10: .Top = 10
        .Width = 100: .Height = 50
        .AddItem "Beijing"
        .AddItem "Shanghai"
        .AddItem "Guangzhou"
        .ListIndex = 0
    End With
End Sub
[Python Tkinter] Use Listbox(). Example (sample file: Samples\ch14\Python\List Box.py):
from tkinter import *
form = Tk()
form.geometry('300x200+100+100')
def Lst():
    idx = lst.curselection()
    for i in idx:
        print('Selected: ' + lst.get(i))
# Create list box
lst = Listbox(form, height=7)
lst.pack(padx=10, pady=10)
# Insert data
strs = ('High School', 'Technical Secondary', 'College', 'Bachelor', 'Postgraduate')
lst.insert(END, *strs)
lst.select_set(3)  # Default select "Bachelor"
# Confirm button
btn = Button(form, text='OK', width=8, command=Lst)
btn.pack(pady=10)
btn['background'] = 'lightgreen'
form.mainloop()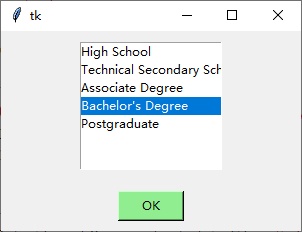
Figure 2-9 Creating and using list boxes
Run the script, select the 4th option, and click the "OK" button. The following content will be output in the Python Shell window:
= RESTART: ...\Samples\ch64-Interface\Python\Listbox.py
Current option: Undergraduate
If the value of the selectmode attribute of the listbox object is set to "multiple", multiple selections can be achieved in the listbox. The storage path of the written Python script file is Samples\ch14\Python\Listbox2.py.
from tkinter import *
# Window
form = Tk()
form.geometry('300x200+100+100')
def Lst():
    idx = lst.curselection()
    str = ''
    for i in idx:
        str = str + lst.get(i) + ' '
    print('Current option: ' + str)
# Create listbox
# Omitted
lst['selectmode'] = 'multiple'
# Click the button to read data from the listbox
# Omitted
form.mainloop()
The running effect is shown in Figure 2-10.
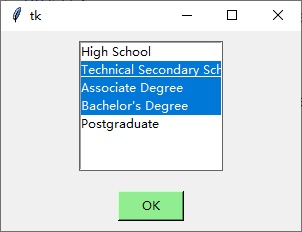
Figure 2-10 Achieving multiple selection of options in the listbox
Run the script, select the 2nd, 4th, and 5th items, and click the "OK" button. The following content will be output in the Python Shell window:
= RESTART: ...\Samples\ch64-Interface\Python\Listbox2.py
Current option: Technical Secondary School Undergraduate Postgraduate
Combo Box Control
Combo boxes combine a text box and a list box.
[Excel VBA]
Design-time: Draw interactively; properties/methods similar to list boxes.
Run-time: Use Controls.Add. Example (sample file: Samples\ch14\Excel VBA\Combo Box.xlsm):
Private Sub UserForm_Activate()
    Dim cmbNew As Object
    Set cmbNew = Me.Controls.Add("forms.combobox.1", "combo1", True)
    With cmbNew
        .Left = 100: .Top = 50
        .AddItem "Beijing"
        .AddItem "Shanghai"
        .AddItem "Guangzhou"
        .ListIndex = 0
    End With
End Sub
[Python Tkinter] Import ttk and use ttk.Combobox(). Example (sample file: Samples\ch14\Python\Combo Box.py):
from tkinter import *
from tkinter import ttk
form = Tk()
form.geometry('300x200+100+100')
# Create combo box
cmb = ttk.Combobox(form)
cmb.pack(padx=10, pady=50)
# Add data
cmb['value'] = ('Beijing', 'Shanghai', 'Guangzhou')
# Set default
cmb.current(0)
form.mainloop()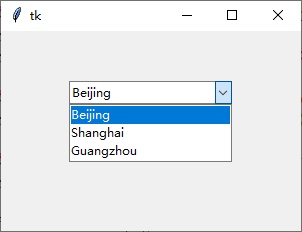
Figure 2-11 Creating a combo box
Spin Button Control
Spin buttons adjust values by clicking up/down arrows (like a scrollbar with two buttons).
[Excel VBA]
Design-time: Draw interactively; set Min, Max, SmallChange, and Value.
Run-time: Use Controls.Add. Example (sample file: Samples\ch14\Excel VBA\Spin Button.xlsm):
Private Sub UserForm_Activate()
    Dim spnNew As Object
    Set spnNew = Me.Controls.Add("forms.spinbutton.1", "spin1", True)
    With spnNew
        .Left = 10: .Top = 10
        .Min = 0: .Max = 10
        .SmallChange = 1
    End With
End Sub
[Python] Use Spinbox(). Example (sample file: Samples\ch14\Python\Spin Button.py):
from tkinter import *
form = Tk()
form.geometry('300x120+100+100')
def Spn():
    print('Current value: ' + spn.get())
# Create spin button
spn = Spinbox(form, from_=0, to=20)
spn.pack(padx=10, pady=10)
spn['wrap'] = True  # Wrap around
# Confirm button
btn = Button(form, text='OK', width=8, command=Spn)
btn.pack(pady=10)
btn['background'] = 'lightgreen'
form.mainloop()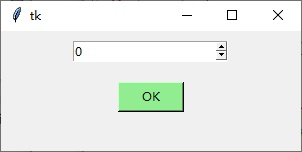
Figure 2-12 Creating and using spin buttons
Frame Control
Frames are container controls that hold other controls.
[Excel VBA]
Design-time: Draw interactively.
Run-time: Use Controls.Add. Example (sample file: Samples\ch14\Excel VBA\Frame.xlsm):
Private Sub UserForm_Activate()
    Dim fmNew As Object
    Set fmNew = Me.Controls.Add("forms.frame.1", "Frame1", True)
    With fmNew
        .Left = 10: .Top = 10
        .Width = 100: .Height = 50
    End With
End Sub
[Python] Use LabelFrame(). Example (sample file: Samples\ch14\Python\Frame.py):
from tkinter import *
form = Tk()
form.geometry('300x120+100+100')
# Create frame
lfr = LabelFrame(form, text='Gender')
lfr.pack(padx=10, pady=10)
# Add options to frame
g1 = IntVar(0)
rdn1 = Radiobutton(lfr, text='Male', variable=g1, value=0)
rdn1.pack(padx=20)
rdn2 = Radiobutton(lfr, text='Female', variable=g1, value=1)
rdn2.pack(padx=20)
form.mainloop()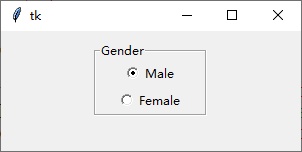
Figure 2-13 Creating a frame